
Polished aggregate concrete has become a sought-after flooring solution in both residential and commercial applications, known for its durability and aesthetic appeal. One of the most captivating styles within this trend is the exposed aggregate polished concrete.
There are many types and sizes of decorative aggregates. In this article, we will explore the details of this method, from understanding the role of exposed aggregate concrete to the best choices for decorative purposes.
What is Exposed Aggregate in Polished Concrete?
Aggregate refers to the materials like sand, stone, or other granular substances mixed with cement to form concrete. When concrete is poured and then polished, the surface can be ground down to reveal the different levels of aggregate materials, giving the floor’s unique texture and appearance to reveal the beauty of exposed concrete.
The depth to which the surface is ground determines the type and amount of aggregate exposed.
3 of the Best Aggregate for Decorative Concrete Floor
When it comes to polished concrete floors, especially the exposed aggregate polished concrete, the choice of concrete aggregate plays a pivotal role in the final appearance.
Here are the best three choices for exposed aggregate concrete floors:
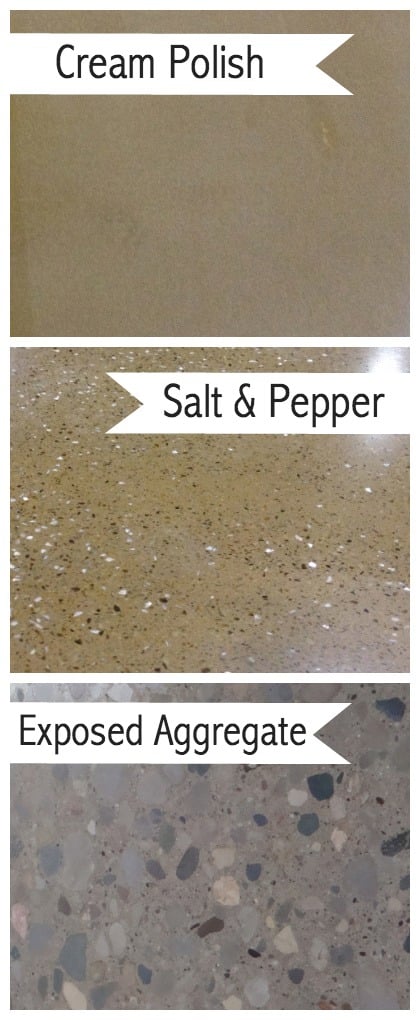
- Cream Polished or Surface Cream: This involves the top layer of the concrete, primarily made from troweled cement paste containing the cement fines of the mix. The grinding process removes only 1/32 – 1/64 inch from the surface, resulting in minimal aggregate exposure. It’s a favored style due to its consistent color, fewer imperfections, and versatility in staining.
- Salt and Pepper: Just beneath the cream layer, this is composed of fine aggregate – a mix of sand and tiny stones. It gives the concrete a distinctive “salt and pepper” appearance. To achieve this, 1/64 – 1/8-inch of the cream layer is ground away, sporadically revealing bits of medium aggregate. Ideally, grinding should commence within a week of pouring the concrete slab.
- Exposed Aggregate: This layer lies below the cream and salt and pepper layers and is made from the coarse aggregate in the concrete mix design. Grinding removes 1/8 – 1/4-inch from the surface, revealing this layer. The process should ideally begin within 3 days after the concrete is poured. Coarse aggregate is available in three sizes: small, medium, and large.
Benefits of Exposed Aggregate Polished Concrete Floor
An exposed aggregate finish isn’t just a trend. It’s a testament to both the beauty of concrete and the functionality of modern flooring.
Here’s why this method is gaining traction:
- Durability: One of the primary reasons for the popularity of polished concrete is its resilience. Exposing the aggregate strengthens the surface, making it resistant to heavy traffic, stains, and abrasions.
- Aesthetic Versatility: From recycled glass and landscaping stone to unique materials like sea shells, limestone, pebbles, stones, and sand, there’s no limit to the design possibilities. This allows for customization to accentuate any decor or architectural style.
- Eco-Friendly: Using local aggregates, recycled materials, or manufactured materials like recycled glass or plastics can reduce the environmental footprint of a project. Moreover, concrete floors have thermal properties that can help regulate indoor temperatures, potentially reducing energy costs.
- Low Maintenance: Unlike other flooring options, exposed aggregate polished concrete is relatively low maintenance. Regular sweeping and occasional damp mopping are enough to keep the floor pristine.
- Cost-Effective: While the initial investment might be higher than some traditional flooring options, the longevity and reduced maintenance costs of exposed aggregate floors make it a cost-effective choice in the long run.
- Enhanced Safety: Polished concrete, especially when finished correctly, can offer a slip-resistant surface. This is especially beneficial for commercial spaces, retail stores or moisture-prone areas.
- Reflective Surface: The high gloss, polished surface can reflect light, enhancing the brightness of an area. This can be particularly beneficial for spaces looking to create an open, airy ambiance or reduce lighting costs.
Incorporating exposed aggregate polished concrete into a project isn’t just about aesthetics. It’s a smart choice for those looking for a blend of beauty, functionality, and sustainability.
As the industry innovates, we can only expect more advancements and options.
Similarly, materials like terrazzo have also gained popularity. While exposed aggregate polished concrete emphasizes the natural elements within the concrete mix, terrazzo floors offer a curated design by combining specific materials, which are then polished to reveal their beauty.
Both methods underscore the industry’s commitment to aesthetic versatility and durability.
How to: Exposed Polished Concrete Aggregates
Achieving the perfect exposed aggregate polished concrete involves a systematic polishing process:
- Preparation: Whether working with a new or existing concrete slab, ensure the surface is even. For new slabs, consider the polished finish part of a holistic flooring system that includes concrete mix design, curing, finishing method, and the polishing process.
- Grinding: Depending on the desired aggregate exposure, grind the surface. For a cream polish, minimal grinding is required. For salt and pepper, remove a bit more, and for fully exposed aggregate, grind down to reveal the coarse aggregates.
- Polishing: After achieving the desired aggregate exposure, polish the concrete to the preferred clarity of reflection. Options range from a ground-flat shine and honed appearance to a semi-polished or highly polished mirror effect.
- Sealing: To protect the exposed aggregate surface and enhance its longevity, apply a high-quality sealer. This step is crucial to maintain the beauty and durability of the floor.
In conclusion, exposed aggregate offers a blend of durability and aesthetics, making it a top choice for modern flooring solutions.
Whether you’re a contractor or a homeowner, understanding the role of aggregate and the process of exposing it can help achieve the desired flooring outcome.
Runyon Surface Prep is pleased to consult with you on the benefits for your specific application. For equipment and expert advice on concrete finishing, give us a call.