
Metzger/McGuire makes industrial concrete floor repair and maintenance products that have set the standard in the industry for over 40 years.
Timely concrete floor repairs are essential to maintaining the seamless production schedules required in industrial and commercial businesses. Even a small crack or surface defect can create a hazardous situation, especially in locations where forklifts or other transport vehicles frequently operate. Metzger/McGuire is dedicated to protecting your clients’ concrete floors, and in turn their most valued assets, with products that will repair cracks, spalls, gouges, missed saw cuts, joint deterioration and pop-outs.
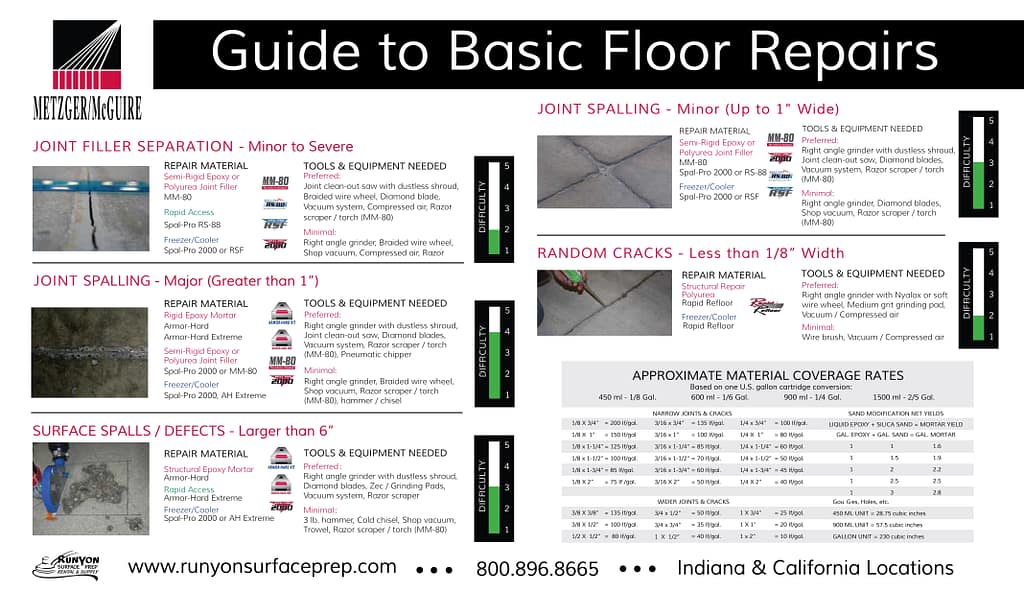
Guide to Basic Floor Repairs
We carry a full line of Metzger/McGuire Rapid Refloor and Spal-Pro floor joint materials, as well as Armor-Hard and MM 80. These polymer fillers are designed for use on industrial or retail concrete floors to repair cracks, surface spalls and pop-outs, as well as other defects that happen over time on concrete surfaces. This basic guide to floor repairs is a comprehensive checklist of general floor defects coupled with the proper Metzger/McGuire solutions and the tools required to get the job done right. Take a look:
4 Critical Steps for Permanent, Durable Floor Repairs
In addition, Metzger/McGuire offers this advice for floor contractors:
- Determine the Causes of Floor Deterioration – Identify the underlying causes of floor defects before you begin repairing them, to determine the best long-term repair strategy. For example, if joint spalling is the result of an improper joint filler installation such as low filler profile or poor joint cleaning prior to filling, the wrong joint filler (urethane that is too soft to support traffic, or no joint filler at all), it’s an issue with the material. Joint spalling could also result from differing slab elevations, called slab curl or rocking slab conditions, which are structural problems that need to be corrected prior to performing standard joint repair.
- Select Appropriate Floor Repair Materials – Choose the repair materials best suited to meet the requirements of your facility’s operations. Considerations may include frequency of traffic, vehicle loading and types, building temperature, time allowed to perform repairs, defect width, etc. For example, the repair material best suited for a spalled joint may be heavy-duty, semi-rigid epoxy or polyurea, or a structural epoxy mortar. This depends upon:
a) the width of the spalled joint with wider exposures, requiring more rigid products
b) the cure time required
c) the current structural condition of the floor
d) the location of the defect, such as a freezer/cooler (polyurea is likely best, in this scenario)
- Prepare Defect for Repair Material – Failure to properly clean and prepare a floor defect is the number one cause of unsuccessful floor repair projects. The key to achieving long-lasting repairs is making sure the edges of the defect are defined and the defect is cleaned properly prior to filling with repair material. Even the best possible repair material will not function properly if it’s placed into a poorly cleaned joint or crack, or if the repair material is “feather-edged” along the outside of the defect. The edges of joints, cracks, and surface spalls all should be at least 1/2” deep vertically, and clean and dry prior to filling, to ensure the long-term durability and structural stability of any repair.
Finished Repair Should Be Flush with Floor – Simply filling a defect “even” with material generally results in a finished profile that is concave or dished, as repair materials typically settle a bit during cure. The goal in any floor defect repair is to restore a smooth, continuous transition across the floor surface. To achieve a flush profile, repair materials should be placed slightly higher than the floor and be allowed to cure, then shaved or ground flush with the surface. The finished profile of any repair should be “flush” with the floor’s surface.